Make dinner more fun by first dissecting the food. This is how you dissect a perch.
It seems ecologically and ethically better not to throw the perch in the trash after the dissection, but to eat it. Think of the dissection as an extra long and interesting preparation of the food. The dissection in its entirety takes approximately 2 hours including cooking. If you are short of time, you can skip the steps marked "extra" - then the dissection takes about 1.5 hours including cooking.
Steg 1
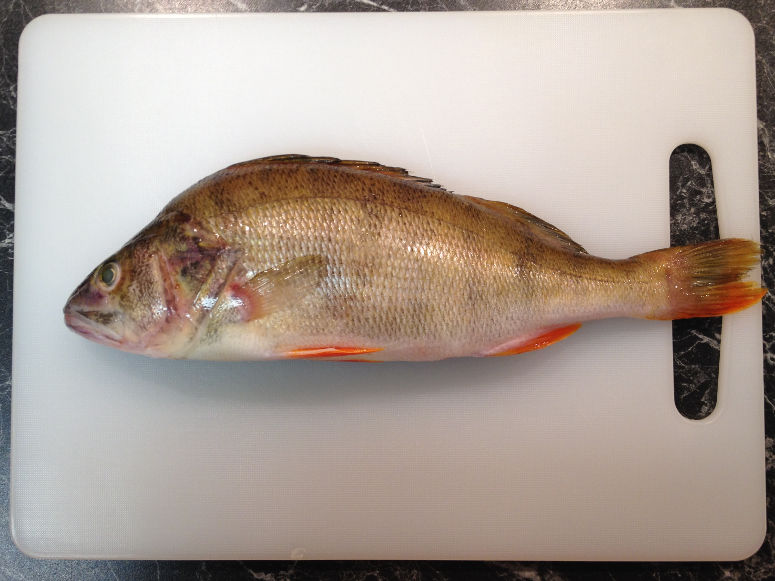
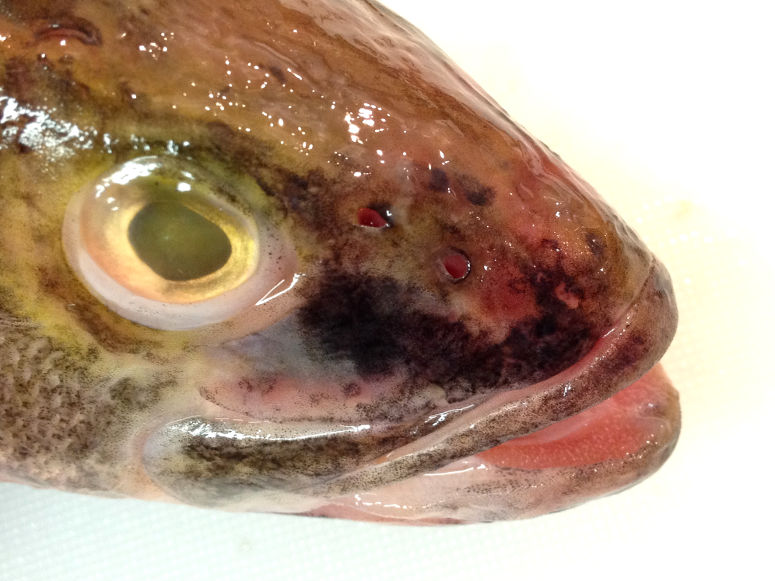
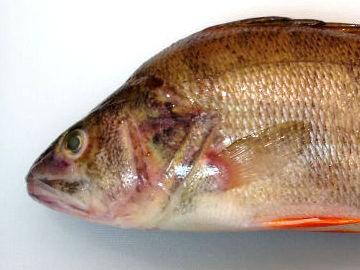
Wash your hands and the outside of the perch and use clean materials. Place the perch on the cutting board in front of you. Study its physical appearance.
Explanation
The perch is easily recognizable by its high body and its greenish base color with dark stripes.
The perch live in shoals, but tend to become more independent as they get older. In some lakes they are so common that competition for food means that no one grows very large. These large collections of perch are called "thousand brothers" in Sweden.
The perch is a popular fish to eat. It has a good taste in itself, and requires only sparse seasoning.
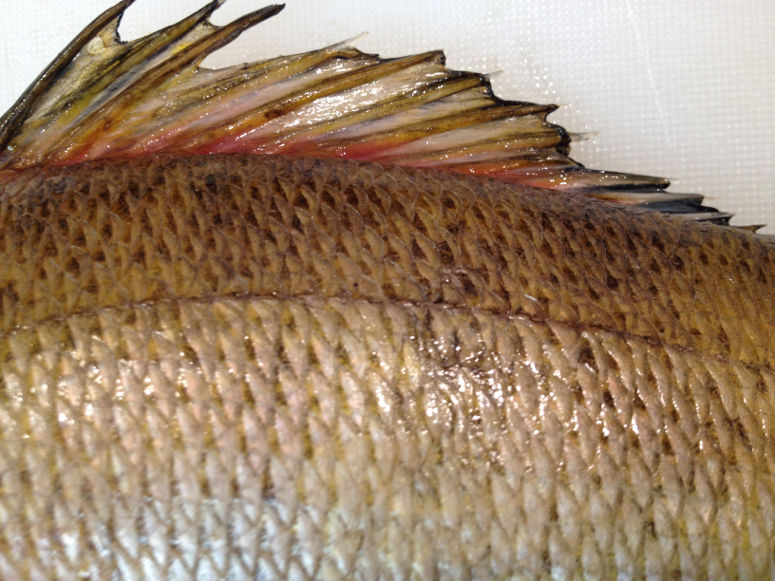
Step 2
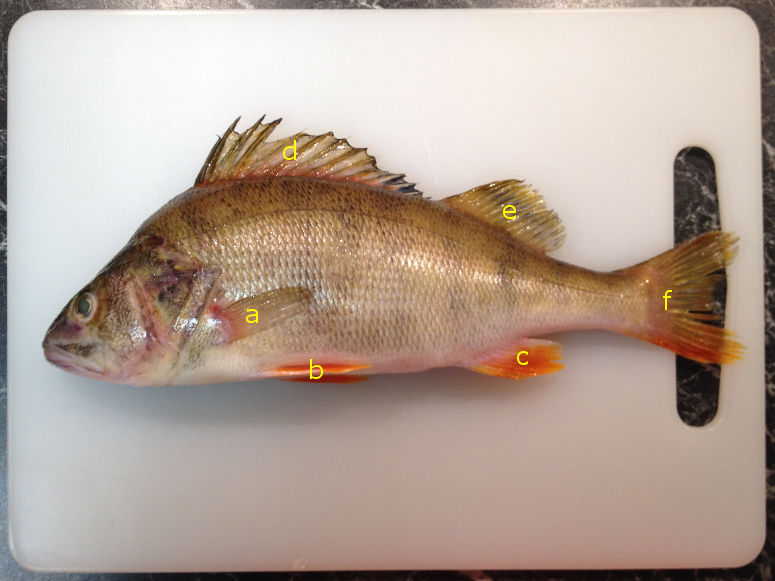
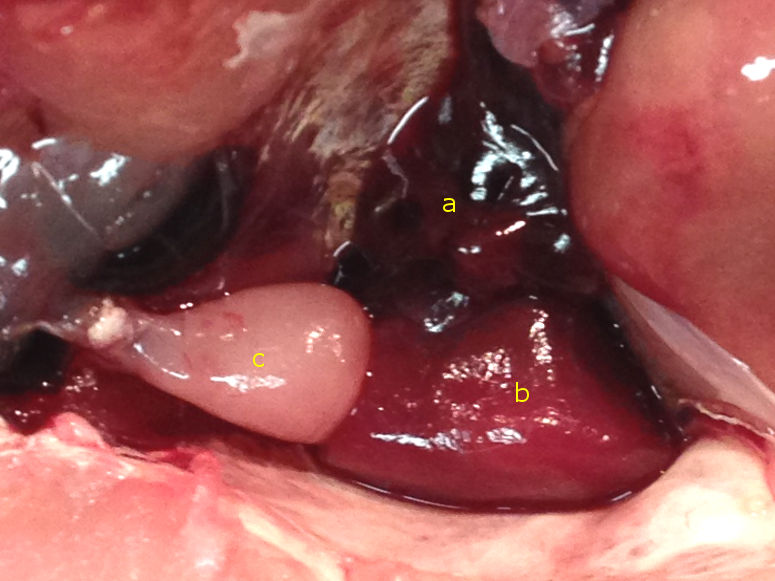
Find the different fins, more specifically two pectoral fins (a), two pelvic fins (b), the anal fin (c), the first (d) and second dorsal fin (e) and the tail fin (f).
Explanation
Just behind the head, on each side, are the two pectoral fins. It was from these fins that the first tetrapod (four-legged) animals developed their front legs. And just as with the front legs of a tetrapod animal, the pectoral fins can create many kinds of movement, including swinging, swimming up and down and stopping.
On the underside of the fish, quite near the head, are the two pelvic fins. It was from these fins that the first tetrapod animals developed their hind legs. These fins are also use by the perch for many kinds of movement, including swinging, swimming up and down and stopping.
Further back on the underside of the fish is the anal fin. This is used by the fish to stabilize in the water (like fin on a surfboard).
On its back, the perch has two dorsal fins, one front and one rear. They help the perch to stay upright and help with quick turns and stops.
On the tail, the perch has its tail fin. It's when the perch beats this and the rest of the tail from side to side that it swims forward.
The fins consist of thin skin folds that enclose fin rays. The fin rays are connected to the skeleton and guide the fins through their movements. Some of the perch's fin rays are spiny rays that the fish also use as a defense.
Step 3
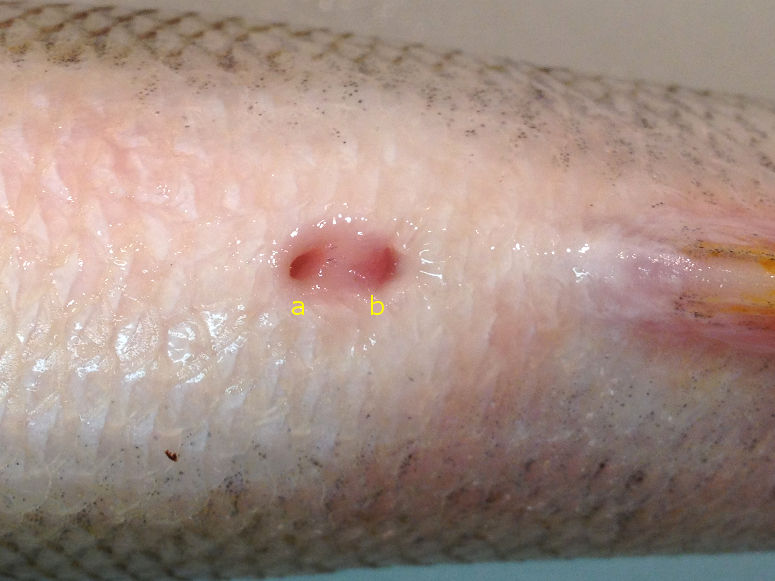
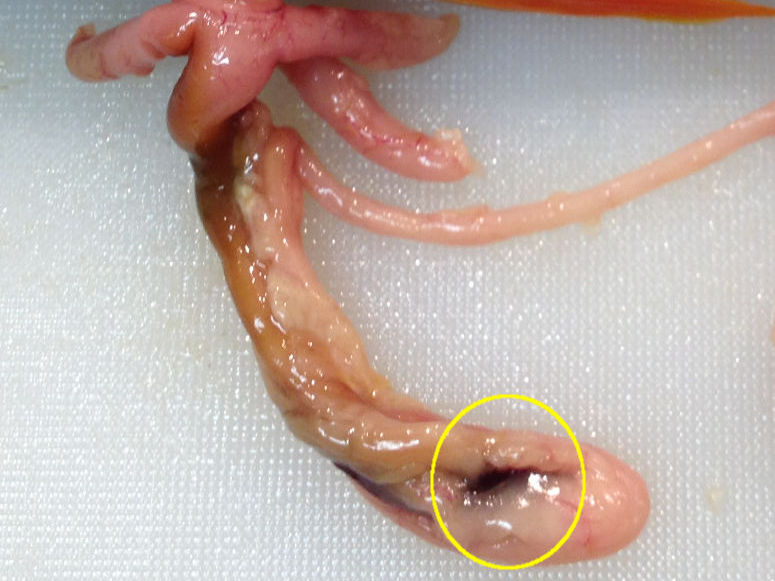
Find the anus (a) and the urogenital opening (b). Use the toothpick to find them. If you squeeze the abdomen a little while stroking it backwards, sperm or eggs often come out of the urogenital opening (or poop comes out of the anal opening).
Explanation
Look right in front of the anal fin. There are two small openings here. In front and easiest to see is the anus, where the fish's feces come out. Behind is the urogenital opening. This is a body opening for two things; the fish's semen or eggs, and the fish's urine.
Step 4
Find the four nares. Use the toothpick to probe a nare.
Explanation
The perch has four nares (nostrils), two on each side of and above the mouth. They lead to two small cavities where there are nerve cells that react to different smells. These nerve cells have close contact with the brain's olfactory center, which is located in the anterior part of the perch's brain.
Step 5
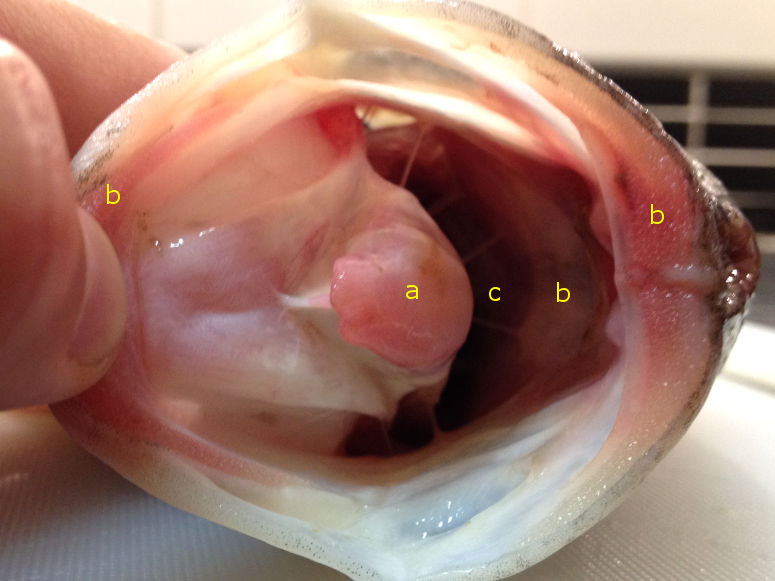
Open the mouth of the fish. Look at the small tongue (a). Use your finger to feel where the teeth are (b). Look through the throat down into the large esophagus (c).
Explanation
The perch has a wide oral cavity, a wide throat and a large esophagus - well suited for eating pretty large prey. The small and pointy teeth are located on the edges of the upper and lower jaw (where human teeth are located), but also inside the mouth behind the tongue and in the palate. Note that they are pointing inwards, which helps the fish to hold on to its prey.
During its first year, the perch eats plankton. Then, when it grows to a length of around 11-12 cm long (4-5 in), it also starts eating insect larvae, crustaceans and small fish. When it grows to 15-20 cm (6-8 in), it almost exclusively eats fish and crayfish.
Step 6
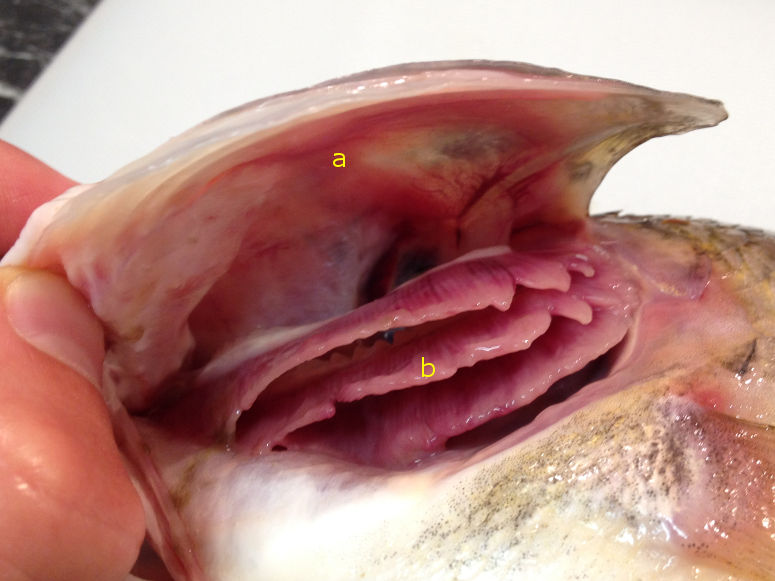
Lift a gill cover (a). Cut it off if you want. Look at the four gill arches (b) underneath.
Explanation
On each side of the fish there's a border that appears to mark where the head ends. This is a lid composed of bone plates - the gill cover (operculum). Under each gill cover there are four gill arches.
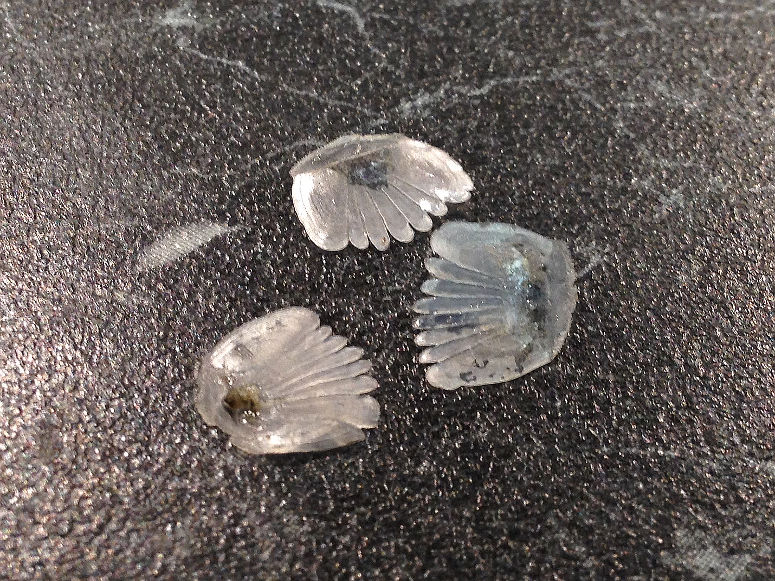
Step 7 (extra)
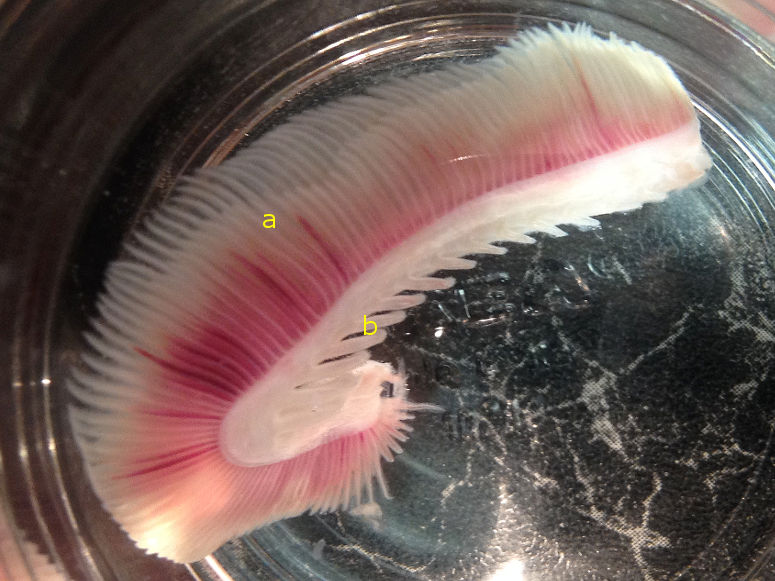
Cut off a gill arch and place it in a glass of water. Take a closer look at the gill filaments (a) and the gill rakers (b).
Explanation
Each gill arch has on its outside two rows of protrusions called gill filaments. In each gill filament are lots of small blood vessels, which due to being so close to the water can take up oxygen from it, as well as leave off carbon dioxide. However, the fish must allow water to pass in through the mouth, and then pass the gill arches and out through the gill cover. Take a look at the path the water takes through the mouth and out through the spaces between the gill arches.
On the inside of the gill arches are small sharp bone protrusions called gill rakers. They probably have several functions in the perch; to create a distance between the gill arches, keep food in the mouth, and catch dirt that would otherwise get stuck in the gill filaments.
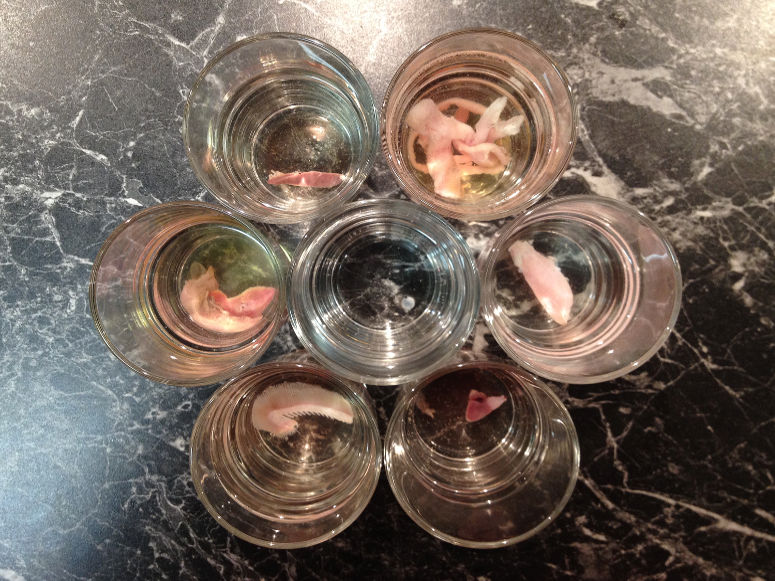
Step 8 (extra)
Organs can be saved (for a day or two) by placing them in a glass of water. In this dissection, you are only instructed to extract
some organs, but you can choose to extract
all organs and then also place them in water glasses.
Step 9
Pull off a couple of scales using the tweezers. Take a closer look at them.
Explanation
The scales grow out of the fish's skin and cover almost the entire perch. They act as protection, like an armor. They overlap each other in the direction towards the tail, which reduces the resistance in the water. On top of the scales there is a super thin and slimy slime coat.
Step 10
Study the lateral line.
Explanation
On each side of the perch is a faintly visible stripe that runs from the gill cover to the tail. It's called the lateral line and consists of small pits. The pits sit on scales with small pores in them, which allow a channel of water to pass through them along the side of the fish. Water enters the canal through small pores in the slime coat. In this water channel, which thus goes underneath the slime coat but straight through the scales, there are special nerve cells (neuromasts) evenly spaced that sense vibrations in the water. The perch can thus feel where a fleeing prey or its schoal is.
In some fish species, the neuromasts are located on the outside of the body, but in most they are located a bit into the skin and appear as a lateral line.
Step 11
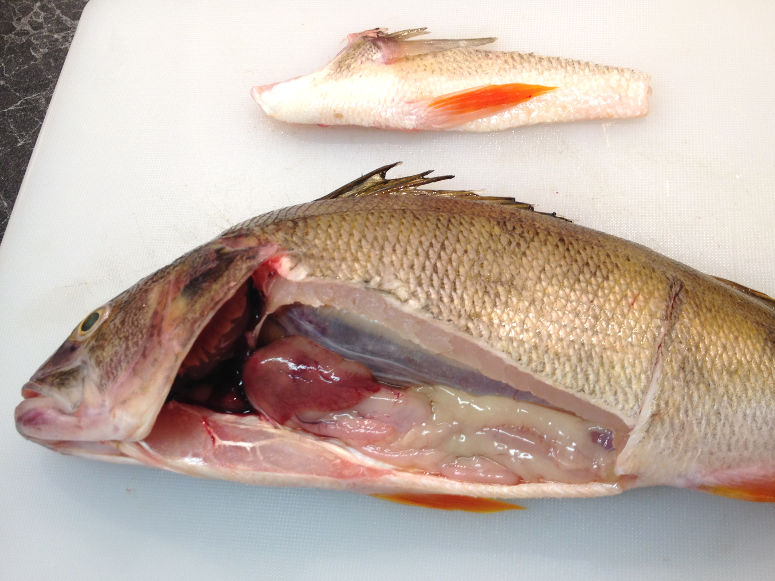
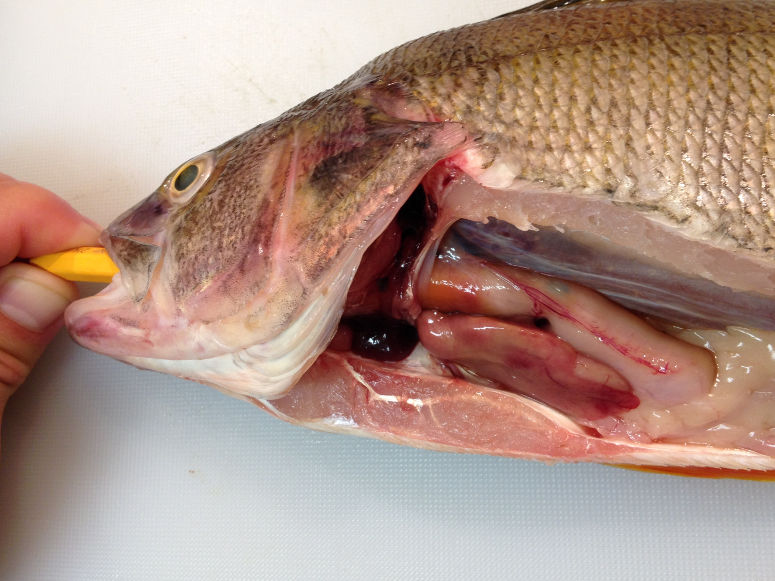
Now it's time to examine the inside of the perch. You will create a window in one side of the fish. Be very careful not to cut too deep, as you can damage internal organs - you should only cut through the scales, skin and muscles. Cut slowly and use nail scissors. Place the perch on its right side. Insert one of the scissors into the anus and then cut along the midline of the abdomen as far as you can until you reach the fish's chin. Then cut along the gill opening up towards the back of the fish (here you will only cut through a membrane). Look at the photo where you should stop. Then cut towards the tail along the top of the abdominal cavity until you end up directly above the anus. Finally, cut straight down to the anus. Lift off the "lid".
Step 12
Take a closer look at the heart. See if you can see these three parts; the atrium (a), the ventricle (b) and the bulbus arteriosus (c).
Explanation
Close to the head underneath the gill covers, is the heart. The heart pumps blood throughout the body. The heart receives deoxygenated blood that originates from the whole body. The blood is then pumped directly to the gills, where it's oxygenated, and then continues throughout the body to finally return to the heart.
A fish heart has only one atrium and one ventricle.
If you take a closer look at the heart, you can see that it's clearly divided into three parts; the atrium, the ventricle and the bulbus arteriosus. The atrium is the thin-walled and dark red "lump" that is closest to the back. The atrium receives the deoxygenated blood from a short and thick vein, which in turn receives blood from two short veins, one from each half of the body, which in turn receives blood from more and smaller veins and so on. During contraction the atrium pumps blood into the ventricle. The ventricle is below the atrium, towards the abdomen and towards the tail, and is muscular and light red. The ventricle then pumps the blood into the thick gill artery straight ahead in the direction of the mouth. The extra thick and muscular first part of the gill artery is the bulbus arteriosus. It's almost white in color. The gill artery then divides into eight smaller arteries, one for each gill arch.
In perch and many other fish, the heart can beat for quite some time after death. You can sometimes make it beat a few times if you squeeze it.
Explanation
Just behind the heart (towards the tail) is a large crescent-shaped and brown organ. This is the liver. The liver has several important functions, including cleansing the blood.
Between the heart and the liver, you may see a thin membrane. This membrane separates the small chest cavity, where the heart is, from the large abdominal cavity, where the liver and most of the organs are.
Step 14
Find the stomach; Insert a pencil through the mouth, over the tongue, down the throat and the short esophagus. It will then end up in the stomach.
Explanation
The path to the perch's stomach is short and wide - which makes it easy for the perch to catch and eat large prey. The stomach can be large or small, depending on whether the fish has eaten before it died. In the stomach, the food is digested.
Step 15
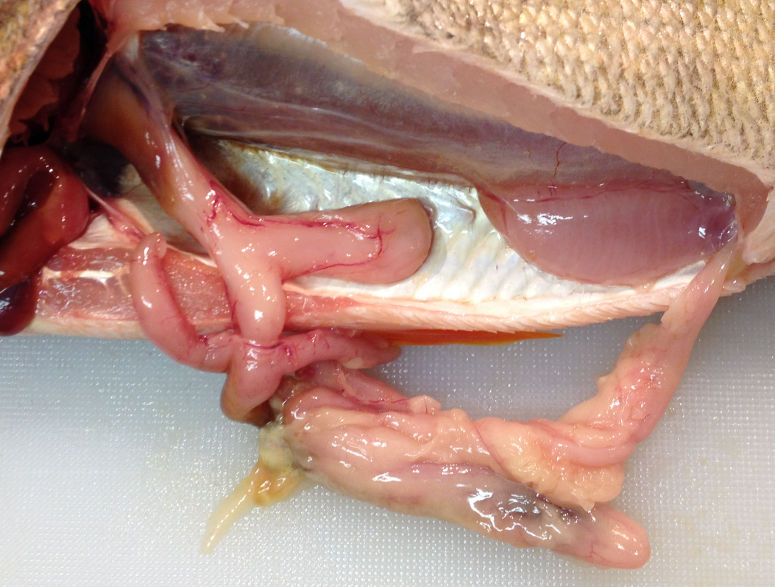
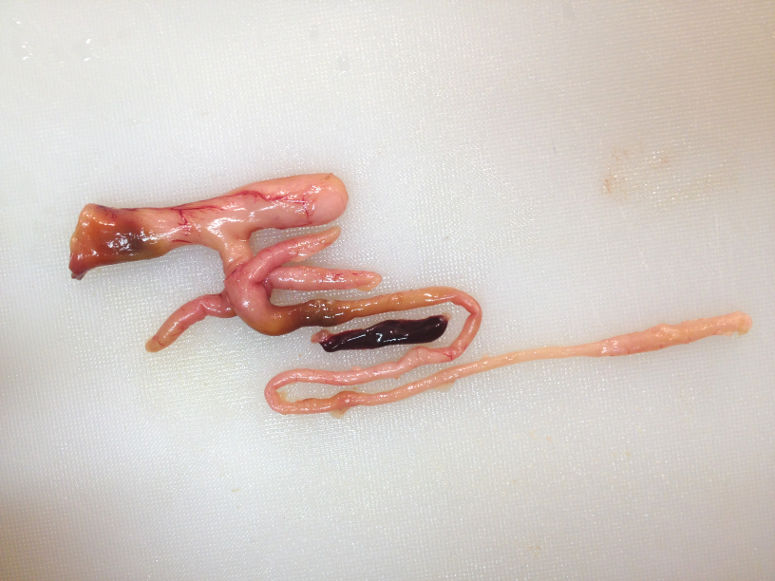
Find the intestine. Use nail scissors to first cut off and remove the liver. Then follow the winding intestine towards the anus. You may need to cut off some membranes and fat to better see the intestine.
Explanation
From the stomach, the food enters the intestine and in it the food continues to be digested. The intestine starts from the middle of the ventral side of the stomach. It first goes backwards, then forwards and finally backwards again. The intestine leads to the anus. The gastrointestinal tract can have a lot of fat around it.
Where the intestine begins at the stomach, there are three rather large appendages. These help with digestion.
Explanation
Inside the arch where the intestine makes a U-turn is the elongated, brown-red spleen. It's attached to the intestine, but its main function has nothing to do with digestion. It cleanses the blood.
You may need to remove some fat from the gastrointestinal tract to be able to see the spleen.
Step 17
Study the gastrointestinal tract more closely. Remove the gastrointestinal tract by cutting loose the stomach at the heart and the intestine at the anus, as well as severing the membranes and blood vessels that hold the package. Place the gastrointestinal tract on the cutting board and clear it of fat, blood vessels and membranes. Remove the spleen. See if you can find any prey in the stomach.
Explanation
The membrane that the intestines are attached to in the abdominal cavity is called the mesentary. It contains blood vessels that lead to the organs.
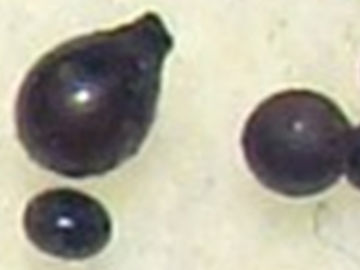
Step 18
Find the testes or ovary (if you have not already done so; remove the gastrointestinal tract by cutting loose the stomach at the heart and the intestine at the anus, as well as severing the membranes and blood vessels that hold the package).
Explanation
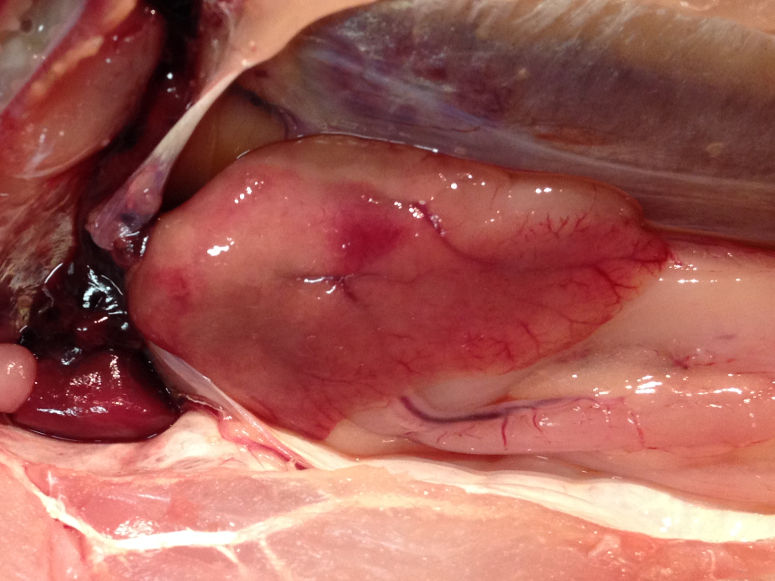
In the posterior part of the abdominal cavity are either two testes (if it's a male) or an ovary (if it's a female). The testes are yellowish and contain the fish's sperm. The ovary is orange and contains the fish's eggs. These organs can fill a large part of the abdominal cavity when it's time for reproduction. The perch in the photo was a female.
The perch spawn during spring and early summer. The shoals swim to shallow water. The female releases her eggs in an up to 50 cm (20 in) long continuous "pearl necklace" of eggs, which attaches to a rock or something similar. The male then releases his sperm over the eggs, and the sperm then enter and fertilize the eggs.
Step 19
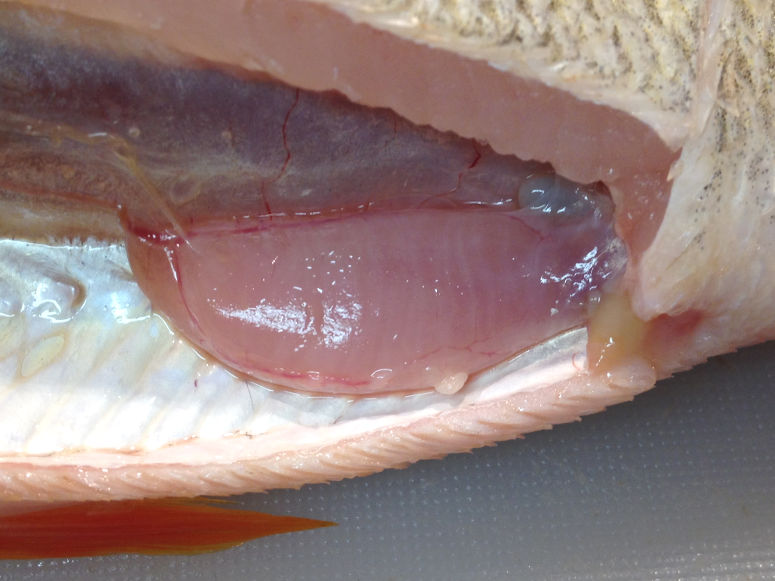
Study the swim bladder. Then puncture it and pull it away.
Explanation
The transparent and bluish membrane you see above the abdominal cavity is the underside of the swim bladder. This is a bladder filled with gas. The function of the swim bladder is to give the perch the same density as the surrounding water. This allows the perch to remain at a certain depth without having to fight against floating or sinking. The amount of gas in the swim bladder, and thus the density of the perch, is adjusted by (mainly) oxygen and nitrogen gas moving between the swim bladder and the blood.
Step 20
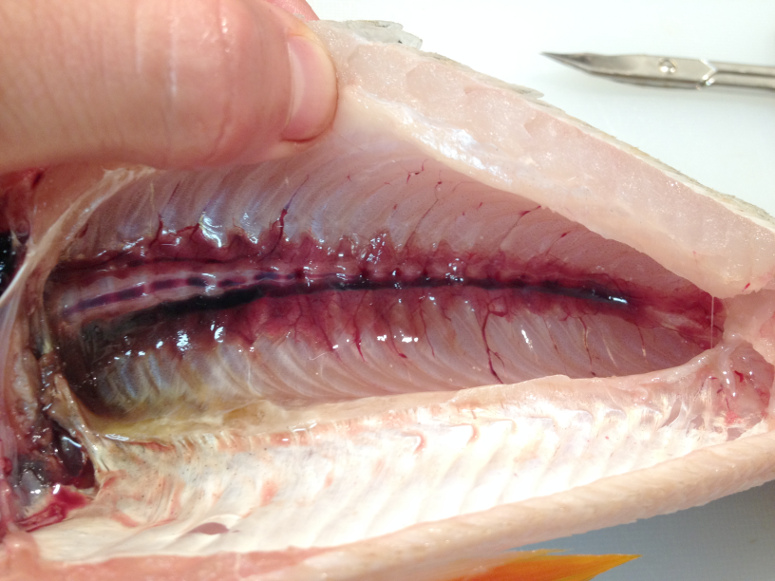
Find the elongated kidneys.
Explanation
Between the swim bladder and the spine are the two kidneys. They hardly look like organs, but more like two long reddish-brown bands. The function of the kidneys is to form urine and thus get rid of waste products that end up in the blood. Towards the tail, the two kidneys merge into a short ureter, which then leads to the urethra. On the way between the kidneys and the urethra there is a small bladder. See if you can find it.
Step 21 (extra)
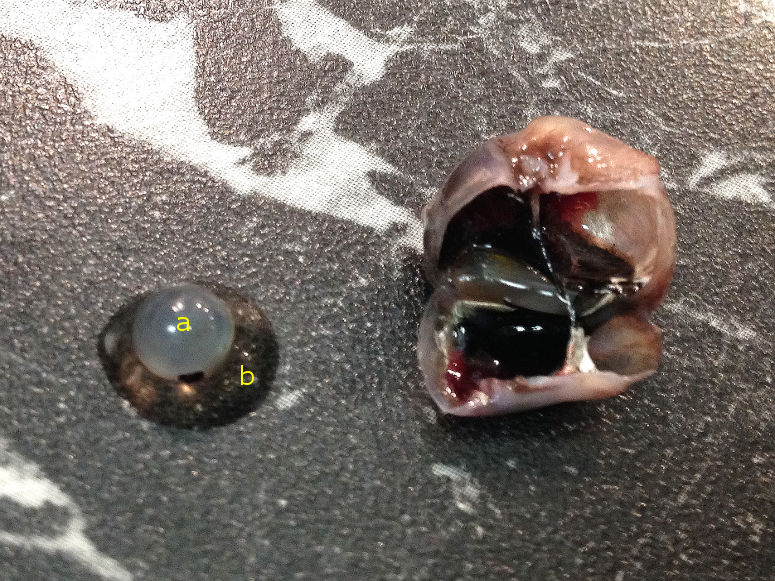
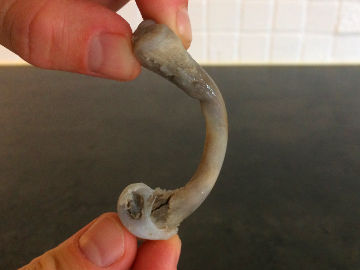
Use the nail scissors to remove and study an eye. Cut open the eye to extract the lens (a) and the vitreous body (b).
Explanation
The eye is attached in both muscles and membranes. Also note the thick optic nerve that the eye is also is attached to. The posterior part of the eye is filled with the gel-like vitreous body and in the anterior part there is the smaller and harder, transparent, lens.
The function of the lens is to focus light on the retina in the back of the eye. In the retina, there are photoreceptor cells that register light and convert it into nerve signals that are sent to the brain via the optic nerve.
The vitreous body is the gel-like mass that forms the space between the lens and the retina. It keeps the eye in shape and contains special cells that keep it clean and transparent.
Step 22 (extra)
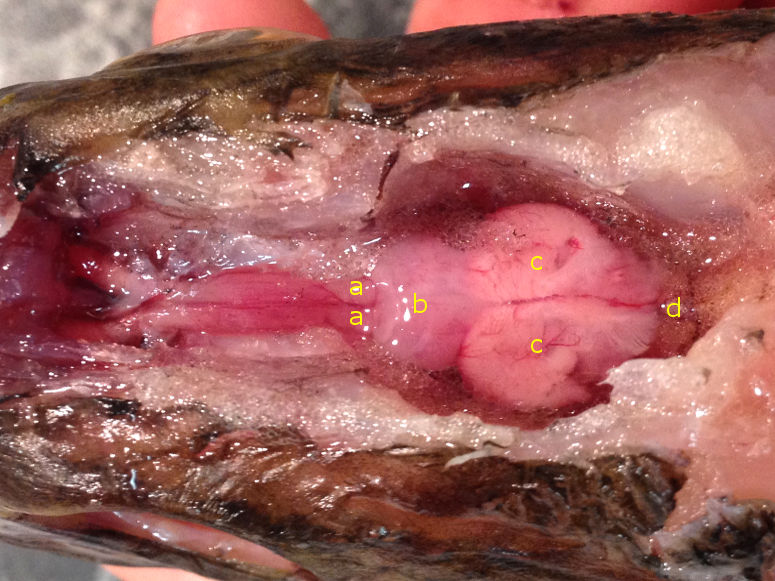
Now comes the most difficult part - to access the brain. Cut the head off and then start from the back by cutting off piece by piece of, or the entire, skull (another option is to start at the eye sockets). Only cut the skull and not the delicate and soft brain underneath. Remove the grayish fat that surrounds the brain. Find the olfactory lobes (a), cerebrum (b), optic lobes (c) and cerebellum (d).
Explanation
If you look at the brain directly from above, you will see some "lumps" - lobes. The two largest lobes, which lie next to each other, are the optic lobes. To these lead two optic nerves, one from each eye. Behind the optic lobes is the cerebellum. Behind the cerebellum, the brain then connects to the spinal cord. In front of the optic lobes is the cerebrum (which is smaller than the optic lobes). In front of the cerebrum, you may see the two small olfactory lobes. To these lead two olfactory nerves, one from each olfactory pit.
The head also contains the otoliths. The otoliths are flat and fairly round stones, made of calcium carbonate. Their weight press on sensory cells that provide information about the fish's position. However, it's difficult to find the otoliths in a normal-sized perch if you are not used to it, so that is why they are only mentioned here.
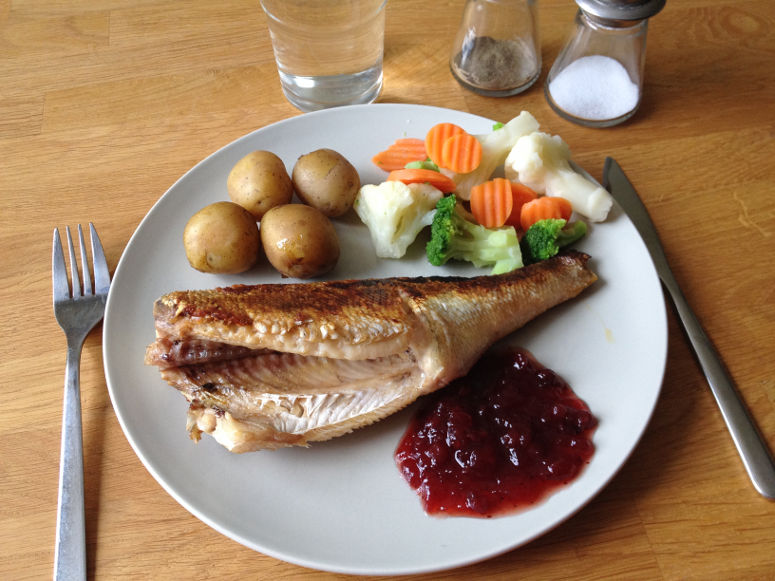
Explanation
Search the web for your favorite recipe. But the easiest way is this: Remove the head and fins. Remove all the entrails and scrape the abdominal cavity clean. Brown the perch in a frying pan with plenty of butter. Keep going until the fish meat is white and opaque, which usually takes 5-10 minutes on each side. Salt and pepper to taste. Serve with your choice of sides.
You can also scrape off the scales and then fillet and/or bread the fish.
You can eat the scales but they are not very good, so if you have not scaled the perch you can avoid eating the skin.
Step 24
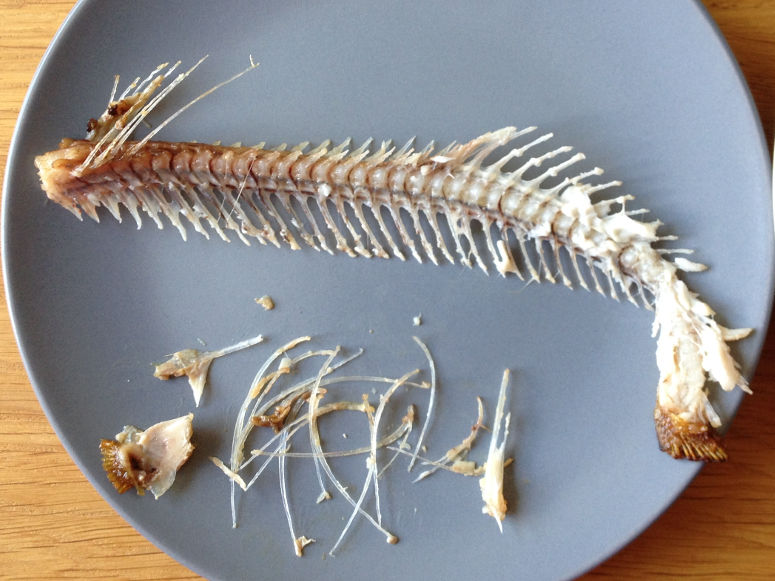
Study the skeleton while eating or cooking the fish. Note how the fins attach to the skeleton. Note how the spine looks. Note the anatomy of the vertebrae. Note the girdles at the pectoral and pelvic fins.